Saturday, May 30, 2015

Elemental Baby Fire Fairy Paperweight in Moss Nest on Rock

We all need a little majik in our lives.  If you haven't made any crafts with fairies, witches, unicorns or zombies, or anything from the fantasy world, give it a try.  You can use colors and ideas that you can't often pull off with everyday life situations. And remember,

  "Life is too short to be cynical.  So smile, dare to believe, and leave the door open for MAGIC." - Anonymous

Last year while walking along a river next to Sun Valley, Idaho, I found a unique rock that made its own "ledge" and like many crafty-minded people I brought it home.  I never outgrew that child inside who loved to collect rocks.  And of course, any amazing rock structure needs a fairy to guard it.  Since it was a small rock, how about a baby fairy?

Here's a little photo tutorial on the how tos:
Supplies I used: Resin Baby (mold from ebay and made with Clear Cast Resin), E6000 glue, Adirondack Alcohol Inks, Copper Krylon pen, a rock, wings cut from clear plastic sheet, hot glue

Granted, this rock was magnificent even without the fairy baby, love love it's crevice.

I cut just the wings off the little cupid out of clear plastic sheeting from packaging.using Tim Holtz'  Mini Love Struck Movers & Shapers die set - you can see what it looks like here LOVE STRUCK by Tim Holtz.
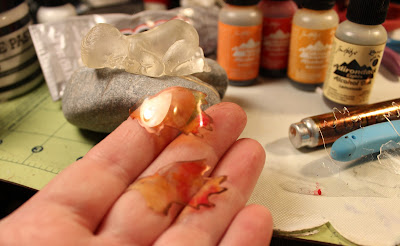
After inking them, I used an embossing gun (Ranger's Heat It tool) and lightly applied heat until the wings started to curl.  I trimmed them to where they would nestle over the baby's arms and glued them on with E6000 (leave a little spot with no E6000 to add just a touch of hot glue so they will hold in place while the E6000 dries).

Thought this might be a little Fire Elemental Fairy Baby, so I touched the wings in Adirondack Inks in tones that remind me of fire.  Colors used were Lemonade, Sunset Orange, Butterscotch, and Red Pepper, then just lightly edged them with the copper toned Krylon paint pen.

Make a little "nest" on the top ledge by first layering a small piece of  Moss Mat (by SuperMoss).  To adhere it well to the rock I put a couple thin lines of E6000 on the rock then just a little hot glue (to areas where there was no E6000), to help hold the moss until the E6000 dried).  Then I just hot glued on little chunks and pieces of Reindeer Moss in two different colors, a darker sage and a lighter Chartreuse.

Since I used a "premade" baby (that sounds funny to me lol) the entire project took less than one hour.

SOooooo darling with a light behind it.

Sleep Well Little Fairy Baby


Tuesday, May 19, 2015

Did I just do a CUTE? Handmade Card - In love with Stamp Girls by 3 Birds Studio

Obviously, by looking at my past creative attempts, I seldom am intrigued by anything that could be labeled "cute" "cutesy" "sweet" ... however, on one bewildering purchase from HSN I ordered the Stamp Girls stamp set from 3 Birds Studios and on a whim even signed up for autoship for future shipments.  Was it because I was half asleep or because the idea that I had 16 female nieces, that may not like my Steampunk or Gothic modes, flowing through my brain? who knows .. but I AM SO GLAD I DID! I had fun making a (shall I say the ewe word?) CUTE card and I love it.  Can't wait to see what the autoship delivers in the upcoming months.
I used Anna Griffin dies for the lattice and corner die cuts and pieced together some older Prima flowers and stamens to create a flower and fished out some other things that were in my stash for embellishments.  I used the Rock-a-Block stamp block by Crafter's Companion (highly recommend those for making a great stamped impression) and colored the image with Prismacolor pencils.

Friday, May 15, 2015

Altered Bottle into Grunge Steampunk Gothic Night Light using Lumiere Metallic Acrylics

Once a glass Heinz Ketchup bottle, now a funky steampunky gothicy night light.

Santa looks more "viking" with wings glued to his head.  This Santa face was made years and years ago from extra UTEE that I had melted in my Melt Art Pot.  I figured if I never used him I could just remelt him later.


The top just screws off in case I ever want to change the lights out.


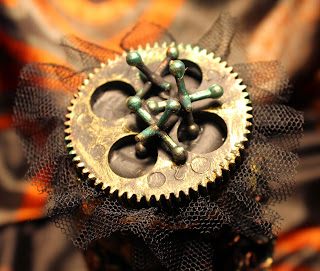
The REALLY big gear is from a mold I made from a gear found in a retro cassette player that my niece (Amber) and I  took apart. It's over 2 inches in diameter and is now one of my favorite embellishments to use, this one is made from the 10 minute Amazing Casting Resin. The thicker small gears are made from resin using the Modge Podge mold titled "Industrial".


To fill in around the diamond shape and in some empty spots, I ran some hot glue and let it dry before painting with gesso.


The roses were from my first try rolling clay thin and trying to make roses, they were a very ugly blue and were not attractive, don't know why I kept them until this project came along.  The face you can see was split before I baked the clay but even damaged embellies can find a home on some altered mixed media projects.
The lid is adorned with another of the giant resin gears I made and a few metal jacks from my stash.


 Thanks to black gesso and Lumiere Metallic Acrylics (colors used:  Halo Blue Gold, Metallic Gold and Citrine) -  I went through my stash of charms and embellishments that I had made when playing around with molds and clay and resins and pulled out a bunch that had been sitting for years that I had never used.  I painted the bottle with gesso (leaving a diamond shape on opposing sides so I could see the light strand) and let it dry thoroughly.  Attached the embellies with E6000 (and a touch of hot glue to hold them in place while the E6000 dried),  Painted the entire creation with black gesso then highlighted certain areas with Lumiere Paints and a little bit of Krylon Gold paint pen).  Added a little tule/chain (from Walmart) around the cap, and just stuck a strand of battery operated rice light into the bottle.  Makes for a great eye catcher and fun way to light up little spaces at night.

Wednesday, May 13, 2015

Trash to Treasure - Handmade Wood Shelf Drawer - Altered to Shabby Chic using Tim Holtz Distress Inks and Inexpensive Paints

Despite my tendency to over embellish, I tried to restrain a bit. I just used supplies I had on hand and I spent a total of $6 for the paper, knob and shelf - now I feel thrifty!

Below is what I started with, a thrift store handmade banged-up wooden shelf  with drawer in a very ugly color, my mom would call it "baby poop" brown. (Actually mom was a rowdy and would have used a stronger word than "poop" but for politeness I'll just leave it at the "P-word.")

I removed the knob, painted the shelf black with Bob Ross Gesso - that dries very quickly. Then I dry-brushed it with white gesso and stressed a few areas with a little sandpaper, gouged some divots and lines with an X-acto knife and scraped some areas to remove some of the paint I had just added.  Using Tim Holtz' Distress Inks I rubbed around some of the edges and flat surfaces and blended with my finger then gently wiped off some areas of the ink with a damp paper towel. I cut a piece of decorative cardstock to fit the back panel, glued it in place with Ranger Multi Medium Gloss, did a little streaking with brown paint and added a sweet new knob as a last step. All done in about one hour.
Tomorrow when the sun is out I'm going to take it outside and spray with an acrylic clear sealer to help preserve the paint (that I already scraped up) to keep it from ... getting ... more scraped up lol ... sounds crazy doesn't it?

I was VERY tempted to leave it at this state (thus the word AFTER add to the photo) -- this was before any of the brown paint and inks were added and before the paper was glued into the back wall.

Scraping some shabby distress into the fresh paint when it was "almost" dry - to get this jumping effect I had to try it three times - painting the white gesso each time and before it completely dried, I laid the edge of the blade at a straight 90 degree angle and put enough pressure to go through the white, but not enough pressure to go through the black gesso - toward the end of the pull I had tooooo much pressure and you can see where I ended up taking off a swipe of both the white and black gesso and revealing the brown.  Since I liked that effect you can see below it on the top shelf, I actually scraped through to the bare wood and later just added a little water based ink to give the natural wood a darker hue. {Picture is to show how I held the blade straight up and down with the sharp edge at a 90 degree angle on the slightly moist paint.}

Side view - I thought at that stage it needed a little more brown, so I poured a little pile of white gesso and squirted a couple streaks of brown paint over the pile.  I did NOT mix it.  Dipping the fine edge of the foam brush directly into the brown and white paint (one dip at a time so not to mix the colors at that point) I applied it in vertical lines by dabbing the brush (at a 90 degree angle), then swiped the flat side of the brush down in 1-2 swipes, that's why there are longer brownish streaks. That results in the white paint somewhat mixing with the brown and gives a variegated pattern that looks pretty amazing. That's a fun technique to use on other projects, like junk journals and tags.

Tools I used for this project: Distress Inks by Tim Holtz (Vintage Photo and Frayed Burlap colors), Tim Holtz' Idea-ology Sanding Grip Block, an iron drawer knob (purchased from the Stinkin' Cute Scrapbook Shop & Boutique in Blackfoot, Idaho), a foam brush, X-acto knife, Bob Ross Black Gesso, Daler Rowney White Gesso, Apple Barrel Acrylic Paint in Chocolate Bar, sheet of BoBunny  Cardstock (12" Weekend Market Antique Item #12WMA470), and Ranger Multi Medium Gloss.

I'm still strongly considering adding the letters CREATE to the top in brownish shabby lettering!  What do you think?

Thanks for checking it out.