Here's a video link of two different Altoid tins that I've altered using clay and resin molded embellishments. CLICK HERE FOR 4.5 MINUTE VIDEO (no sound).
I made an altered Altoid tin covered in polymer clay, but the idea I had for an opening latch didn't work out, so, I needed to cover up my failure.
 I found a great cameo pendant, but, cameos didn't match my dragon (sad day) plus I had used the Enchanted Forest G45 paper inside, so I needed something medieval. I had an old vintage charm with a shield, but I didn't want to use my only shield charm.
I grabbed the Castin' Craft Easy Mold Silicone Putty. It's super easy to use. 1:1 Ratio (I buy mine from Amazon)
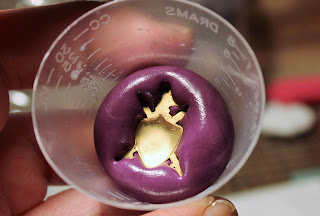
I usually use a weight scale in grams to make sure I get the same portion of "purple" to the "white" - but I didn't have a scale when I first started making my own molds, so I'm guessing most of you don't either. Remember as a little kid squishing bread into squares?? (No? just me?? ) well, make a square of each one trying to make sure that together you will have 1.5 to 2 times the size of your charm and the white square is the same size as the purple square. Smoosh smoosh and smoosh them together (this is fast setting so get those fingers working fast!) Once the two colors are combined quickly roll into a ball. For small pieces I drop into a small container like this resin (medicine) cup and straight down. I used the end of a paint brush since this was a tiny piece--slowly, press the charm about 1/2 way into the putty.
In about 10 minutes the putty hardens and just pop out your mold from the cup and gently remove your charm and you have a mold you can use and reuse over and over and over for resin or clay.
Let the mold set for at least 10 minutes (probably should let it cure longer but I'm impatient)
I mixed a tiny amount of Amazing Cast Resin (I get mine from Amazon) and quickly poured into my little mold. It's a 1:1 ratio so it's easy to mix too. But again, work fast, this is fast setting resin. You can tell it's mixed properly when mostly clear and not cloudy, but after it sets in your mold for a minute or two it starts to turn white. In between 5-10 minutes you have a hard white replica!! (wait to take it out of the mold until it feels HARD to the touch, not tacky. Also, it should not be warm or it is still setting up. Bigger pieces get almost HOT to the touch.
When you first remove the mold it may feel a little soft and bendy, this is a great time to use your Tonic scissors (or other nonstick scissors) and remove any resin you don't want, For instance, I don't want the connect loop. So, I just clipped it off. Quickly lay on a flat surface to fully harden, usually within 1-5 minutes. Paint with acrylic paint, or alcohol inks.
I found that E6000 holds the world together, including resin to steel so I attached my resin shield over the cameo.
Used a little Inka Gold rub n' buff and a gold Krylon pen for detail. Attached my new piece to the top portion of my polymer clay covered Altoid tin ... and covered my mistake. (PST .. this is also the exact way I made the dragon pieces).
Have fun molding!! I'll get the video up later in the summer.


