I'm just going to copy and post most of this, if there are typos ... blame the old me from years ago :D
__________________
First - get yourself one of those Tyvek mailers (or a piece of Tyvek from the hardware store or Amazon) they're the ones that are hard to tear but they're a different material than paper (but not exactly plastic either) - Here's one that's been used (because it's not legal to use free USPS materials for anything than shipping with USPS= but it does say to "recycle" the used ones so ...
Cut the Tyvek and a piece of cardstock the same size (the color you choose will be inside your book).Cut them as tall as your mini album will be (say a 6" mini album would need a piece of cardstock and Tyvek 6" tall and a minimum of 11" long for a 5 page mini album) glue the 2 pieces together using a STRONG glue or Xyron .. NO glue sticks!! I like E6000 spray but some people don't, you can use whatever you like as long as it will give a good bind without being bulky. Let dry thoroughly. If you are using the E6000 spray, remember to spray completely on one of the pieces and press hard, keep pressing occasionally and let dry COMPLETELY before moving to the next step (usually about 4-5 minutes with the E6000 spray).
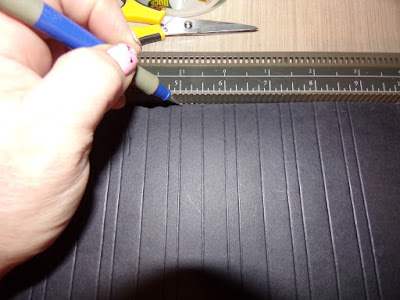
This sounds confusing, but it isn't, just look at the photo ...You will leave 1.5" or more on each end of the paper/tyvek piece. Start in the middle, score in the middle. On each side of the middle score line, do a scoreline 1/2 inch away - then a score 1/4" away on each side, then a 1/2" score on each side, then another 1/2" score, then a 1/4" - do this until you have as many page holders as you need (a page holder is 2 of the 1/2" scorelines, when folded on the scoreline, the 1/4" spacers just leave ample room for your embellishments). Remember to leave AT LEAST 1.5" on each end to hold your covers.
Fold on lines - Mountain folds between 1/2" sections and Valley Folds where 1/4" meets a 1/2" section ... On the back side, where the Tyvek is, put a piece of ScorPal Tape,Terrifically Tacky tape, or strong glue if you use several clips till totally dry, between the 1/2" sections to hold them together, You will be attaching your pages on these.
I'm making two bindings for 2 different books at the same time -- that's why you will see two in the pictures below. After you stick together the 1/2" sections, use a bone folder and press the creases. Push the 1/2 sections to the other direction and press well again.
Push the ridges back and forth to get them limbered-up for the turning of your pages - don't forget that little 1/4" on each end (the one right before you get to the 1.5+" space on the very end ... those will be the ones that hold your front and back covers with a spine cover between.
Use a Black Sharpie marker, or a touch of black alcohol ink to touch up little edges where the tyvek is showing through and
YOU ARE FINISHED!!!
UNLESS
You prefer a flexible spine and not one covered by chipboard. If you want a flexible spine and want "extreme" reinforcement (I'm always afraid a drop or tug will destroy a book I've worked on so I usually go this extra mile ---
Cut another piece of Tyvek and another piece of paper the same size as your binding. Glue the Tyvek to the paper (this paper will be what everybody sees as your spine). Let dry completely. Once dry, you can emboss it - paint it or any treatment you desire BEFORE attaching it to your page binding.
If you want to emboss your spine cover, now's the time to do that. I ran these through a Tim Holtz Halloween embossing folder and more embossing on the edges with a steampunk folder (you can see that in the video below) and then put a drip of white acrylic paint on a paper towel and lightly brushed over the embossed image.
Now attach (strong glue again, the ScorPal or Terrifically Tacky tape) the binding piece to the spinal cover piece (You will be gluing the 2 Tyvek sides together). Make SURE you get the edges and corners glued together well.
If you use a strong glue instead of ScorPal or other tacky tape, make sure you clip it tight and let complete dry before using for your book. A week bonding glue will not work well for this project or last over years of using your book.
Now just add your pages and covers.
Here is a Steampunk Halloween Mini Album that I made from this bind.
Sorry if the video makes you seasick, YouTube said "we see your video is shaky, would you like us to fix that ?" I clicked YES and .. now it's not shaky .. but it's wavy and weavy lol.
If you have ANY questions or something isn't clear, please don't hesitate to leave a comment and I'll see if it is something I can help you understand. Thanks for lookin'.
HAVE FUN CRAFTING.


