Tuesday, December 27, 2016

Mountain Town Snow Globe Shaker Card using Tim Holtz and Stampin' Up Products (TH Snowglobe Thinlit dies) - Handmade Christmas / Holiday card

two layers of foam - the card is thick to allow room for the snow (mica flakes and silver/gold glitter) to easy "shake" around, used Bazzill paper, snowflake stamps (Martha Stewart) in background embossed with white embossing powder, metal Tim Holtz idea-ology word tag, red twine from a Dollar Store, snow flakes on corners where molded from white resin and touched with Ranger Stickles, punched edgings from Stampin' Up punches.

Saturday, October 29, 2016

Harley Quinn and Brown-eyed Bride Wedding Handmade Cards using Anna Griffin, Tim Holtz products and Three Birds Studios stamps

I usually stick to Halloween, Steampunk, Gothic or holiday crafts but I have a niece's bday next month who loves Harley Quinn and a wonderful friend is getting married in December ... so it was time to pull out the cutesy Three Birds Studio girls stamps, some Ranger / Tim Holtz texture paste and Distress Inks , Spectrum Noir markers, Anna Griffin dies and sentiment stickers .. Flowers and Feathers from my stash.


Friday, October 28, 2016

Halloween Village Combining Villiage, Bungalow, and Manor Tim Holtz Dies, Moss, Popsicle Sticks, and lots of Embellishments

Every building has 1-5 battery powered tea lights - I combined several of Tim Holtz' Village dies (including Vintage Village, Village Bungalow, Village Brownstone, Village Manor, Village Rooftops, Village Bell Tower) to create my own version of a haunted village.  Also used his Cobblestone, Gothic Gate, On the Fence), and Sizzix Where Women Cook Box House Die.
Used 4 Vintage Village houses, 2 Manor toppers and the Manor door, 2 of the Bungalow windows to make a fun "big" scary manor, The little mailbox actually opens to reveal a tiny envelope.  Inside the envelope .. yep, a letter to the witch.  Tim Holtz Idea-ology Pumpkin Pieces & Boneyard Bones, some moss and mushrooms from my stash and I made a resin molded cat, skull and "brick" fence piece.  The "siding" is broken up popsicle sticks.

Every HAUNTED village needs a Witch Apothecary where the citizens can get their potions and herbs.  Combined 2 Manor doors, a Bungalow window and 2 Brownstone houses.  A resin skull face wearing a great plastic Top Hat welcomes you in after you've looked at all the herbs (bones & snake) drying in the yard.

side

back of climbin roses

pulled glue to give the cobweb appearance

 Tim Holtz' Gothic Gate and Boneyard Bones welcomes you to the city cemetary
I made some resin skulls and tombstones that are guarded over by a Tim Holtz Idea-ology Salvaged Doll

 What village doesn't have an eatery?? A glamour witch owns the Witch's Kitchen (obviously she's glamorous, who else would have a purple glitter roof).  She kept true to her parking rules ... if you aren't a witch, you will be "Toad"

A manor house with bone steps


A pumpkin patch is patrolled by a black kitty with green eyes ... white spotted red mushrooms popped up around the mail box, around the fence .. even one on the roof.  A black bird overlooks the pumpkins, probably hoping for a mouse to run between the vines.

 of course there's a tiny envelope in the mailbox (and it does open to reveal a little message on a letter to the witch that lives in the house).  A chopstick left over from a noodle restaurant makes for a great mailbox post.

 Gray cardstock cut with Tim Holtz' COBBLESTONE die made for a fantastic walkway.
The fence-topped Manor roofs are NOT attached.  That way I can just pick them up to turn the battery operated tea lights inside each manor topper off and on.

Thanks for looking. :)


Sunday, August 21, 2016

Halloween Witch Prima Nutting Doll Tag with Tim Holtz Crazy Cats

I joined my first Prima doll tag swap at MAS last month (Beach was the theme) and I fell in love with these darling stamps.  Yes, Julie Nutting has been designing these stamps for quite some time but I have avoided them and all their ooey gooey cuteness.  Since I received 2 of the stamps from MAS members when I was the "Cat's Meow" (a gift swap) I had to put them to good use - so I joined the swap due on October 1.  The theme was Autumn/Halloween.

Here's what I came up with:

Embossed the stamped images with white embossing powder.  Pulled out some old flowers and the Stampin' Up HodgePodge metals.   The background is dyed texture paste and the Harlequin Stencil by Tim Holtz.

The back is just a simple pocket (with a tombstone mwhahaha) so I can put my swap information on the tag.

Since I didn't have a hat stamp big enough I just hand cut out one and rolled the edges in pigment ink and white embossing power to try and make it match as much as possible ... OHH and googly eyes for the cat!!

Thursday, July 21, 2016

Dragon's Eye View -- Tin altered to Red Dragon Eye with Leaves - Polymer Clay

While waiting for some errands, I saw yard sales signs ... quite disappointing.  Literally 5 little boxes of broken items, dust, and little things a lady had pulled out of her storage unit.  She was so nice I felt I should buy something so I found a little dented tin that looked like it once held a Mickey Mouse watch from Walmart, it was about 4 inches x 6 inches in size. She said 25 cents and I handed over a quarter ... got home, pulled out the white clay .. the paint .. a piece of glass and the rest is just a Dragon's Eye view ...


Thursday, June 30, 2016

POLYMER CLAY DRAGON EYES - First attempts, more to come

I've been having sooo much fun playing with polymer clay and rhinestones for two days!! ... makin' "Dragon's" Eyes !! I watched a few tutorials  and added a few of my own techniques and came up with some fun stuff.  Most all of them have loops where I can connect chains, ribbons, gems, and crystals to the top and bottom- If there's enough interest I'll make a video showing what I did different than the videos I watched.  To see the video tutorials I watched on Youtube to get inspired CLICK HERE and for another video, CLICK HERE TOO :)

My lighting isn't very good so the photos are not showing the vivid colors but here's some photos!!!


Sunday, June 26, 2016

WIP - Dragon Eye Pendant Charms from Polymer Clay & Glass

I've been reading some of the books on the dragon aspects in World of Warcraft lore (yes that's my old lady gaming vice) and decided to make Dragon Eye charms for the upcoming Midsummer Night's Dream Enchanted Forest Chunky Charm Swap at MAS.  I watched probably no less than 12 videos on YouTube and sat down with my clay and glass pebbles.  I had made some several years ago but these are looking much better.  So much inspiration on YT -- after I perfect these a bit I'll post more pics.  If you need inspiration just search "Dragon Eye Clay" on YouTube and you'll find dozens of videos.

Wednesday, June 22, 2016

Basic Silicone Mold and Resin Mixing Coloring Information

Playing with resins is a LOT of fun.   I use resin embellishments on almost every craft I have created.  But, it wasn't long ago that I was timid toward the stuff because I had NO idea how to use it and I didn't want to waste money, I didn't know what was the easiest products to use for a beginner.  Merry at Mini Album Scraps asked me to make a video so just we, basic crafters, would know what to do if they found a little piece or necklace they wanted to turn into an embellishment, so here ya go !! I made 3 videos showing Types of Molds, How to Make Your Own Molds, and How to Use that Resin.  I show a few products that I found the easiest to use for a novice crafter who just wants to have fun.

Here's the first one that just tell you a little bit of info on Molds
Here's the second one that gives info and demonstrations on using products to make your own silicone molds


And the third one that shows some resin products, adding color to resin if you don't have pigment powders, and a few demonstrations even making two toned cabochons. 


Sunday, May 1, 2016

Quick Mold from Silicone Putty and Amazing Resin 10-minute cast Tutorial - for Altered Altoid Tin

I told Merry (admin. for MiniAlbum Scraps (MAS)) that I would do a video tutorial on making molds and resin pieces for mixed media by summer, but I've had a few crafters ask me some questions so thought I'd put just a few photos up for those wanting to hop in before I get a video made.  The video will show a couple other products and tips but here's the jest ...

Here's a video link of two different Altoid tins that I've altered using clay and resin molded embellishments. CLICK HERE FOR 4.5 MINUTE VIDEO  (no sound).

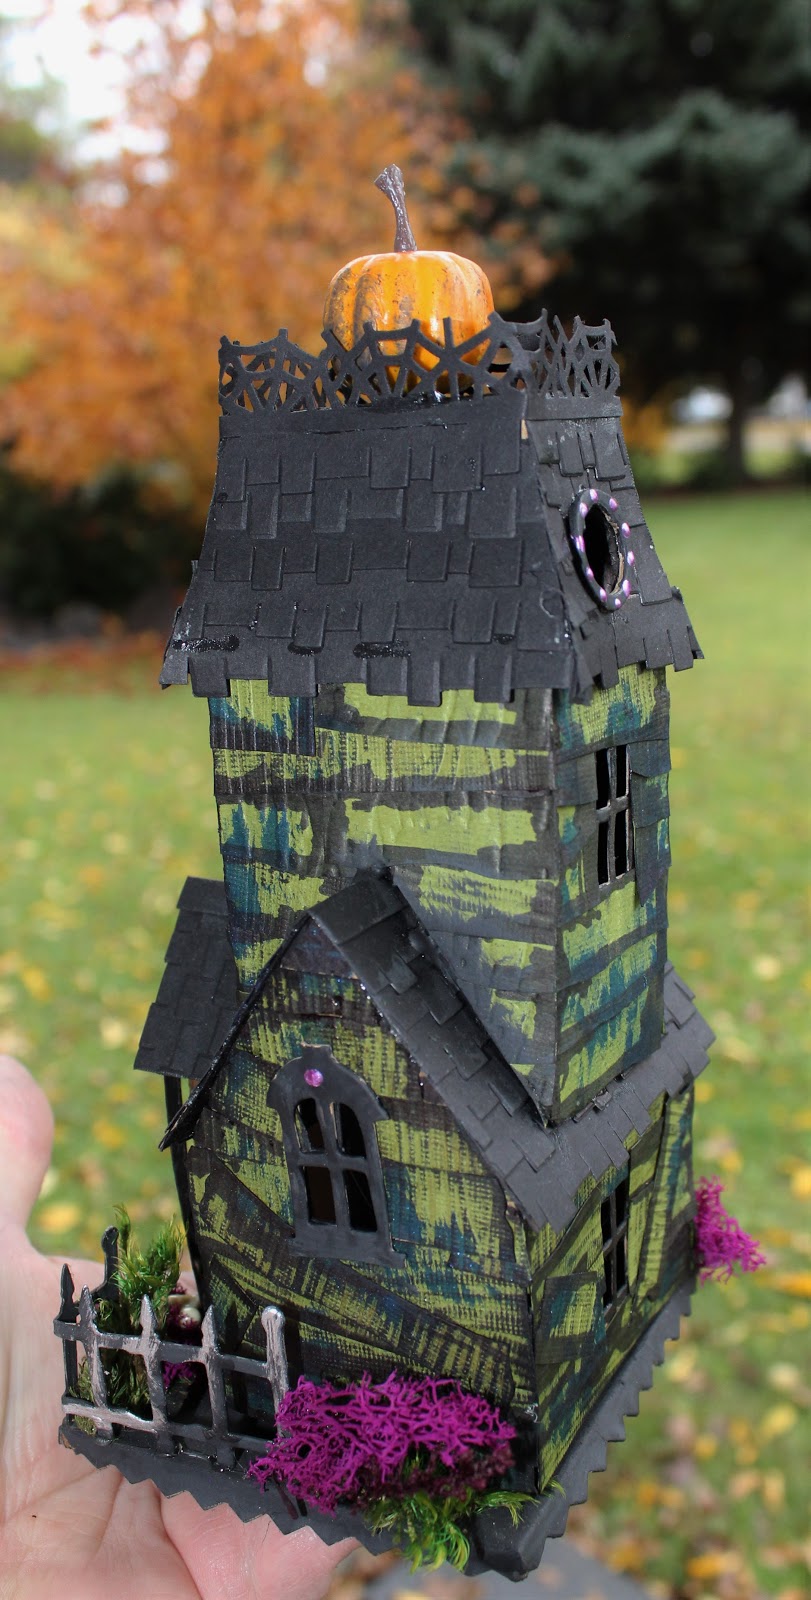
I made an altered Altoid tin covered in polymer clay, but the idea I had for an opening latch didn't work out, so, I needed to cover up my failure.
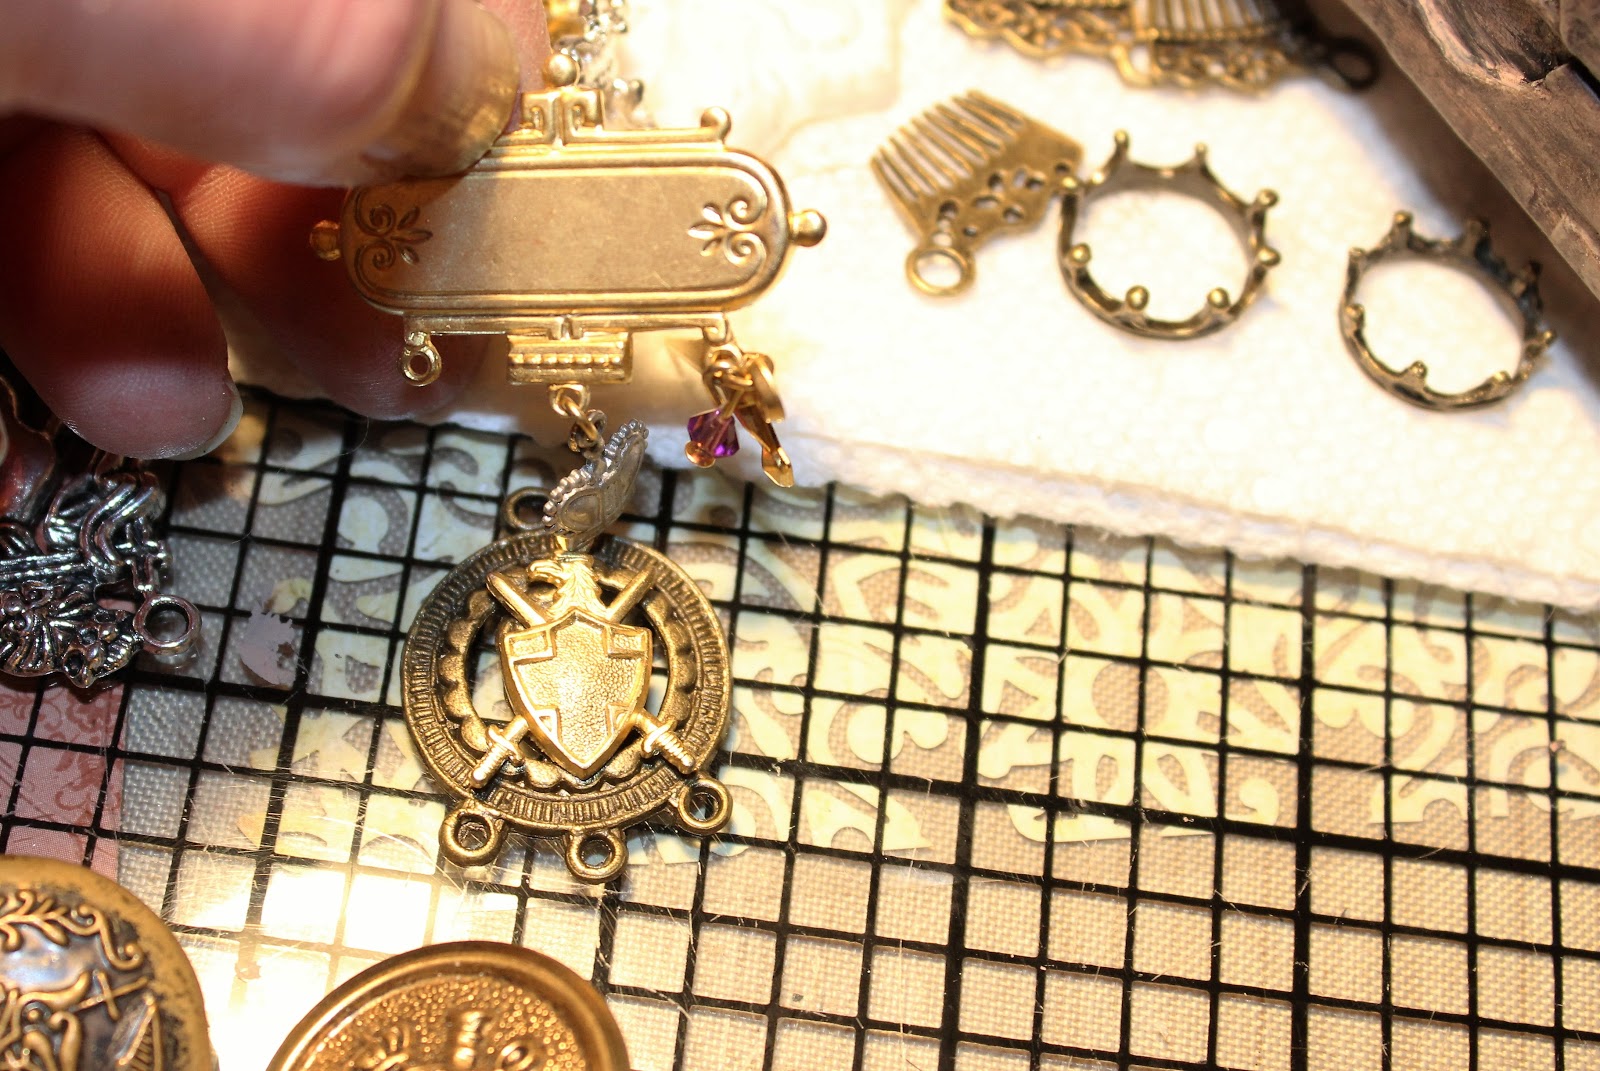
I found a great cameo pendant, but, cameos didn't match my dragon (sad day) plus I had used the Enchanted Forest G45 paper inside, so I needed something medieval.  I had an old vintage charm with a shield, but I didn't want to use my only shield charm.  
MAKE A MOLD of it!!!
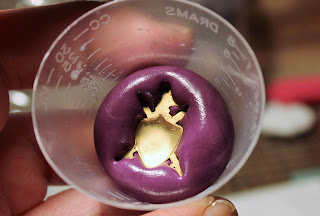
I grabbed the Castin' Craft Easy Mold Silicone Putty. It's super easy to use.  1:1 Ratio (I buy mine from Amazon)

I usually use a weight scale in grams to make sure I get the same portion of "purple" to the "white" - but I didn't have a scale when I first started making my own molds, so I'm guessing most of you don't either.  Remember as a little kid squishing bread into squares?? (No? just me?? ) well, make a square of each one trying to make sure that together you will have 1.5 to 2 times the size of your charm and the white square is the same size as the purple square.  Smoosh smoosh and smoosh them together (this is fast setting so get those fingers working fast!) Once the two colors are combined quickly roll into a ball.  For small pieces I drop into a small container like this resin (medicine) cup and straight down.  I used the end of a paint brush since this was a tiny piece--slowly, press the charm about 1/2 way into the putty.

 In about 10 minutes the putty hardens and just pop out your mold from the cup and gently remove your charm and you have a mold you can use and reuse over and over and over for resin or clay.

Let the mold set for at least 10 minutes (probably should let it cure longer but I'm impatient)
 I mixed a tiny amount of Amazing Cast Resin (I get mine from Amazon) and quickly poured into my little mold.  It's a 1:1 ratio so it's easy to mix too.  But again, work fast, this is fast setting resin. You can tell it's mixed properly when mostly clear and not cloudy, but after it sets in your mold for a minute or two it starts to turn white.  In between 5-10 minutes you have a hard white replica!!  (wait to take it out of the mold until it feels HARD to the touch, not tacky.  Also, it should not be warm or it is still setting up.  Bigger pieces get almost HOT to the touch.

When you first remove the mold it may feel a little soft and bendy, this is a great time to use your Tonic scissors (or other nonstick scissors) and remove any resin you don't want,  For instance, I don't want the connect loop.  So, I just clipped it off.  Quickly lay on a flat surface to fully harden, usually within 1-5 minutes.  Paint with acrylic paint, or alcohol inks.

I found that E6000 holds the world together, including resin to steel so I attached my resin shield over the cameo.


Used a little Inka Gold rub n' buff and a gold Krylon pen for detail.  Attached my new piece to the top portion of my polymer clay covered Altoid tin ... and covered my mistake.  (PST .. this is also the exact way I made the dragon pieces).

Have fun molding!!  I'll get the video up later in the summer.

Saturday, March 19, 2016

Nautical Steampunk Shadowbox Tag using Graphic 45 and Tim Holtz products (Inspired by Tim Holtz' Tags of 2016)

Inspired by Tim Holtz' March Remix for the Tags of 2016 Challenge - the imagination in that man releases the crafting juju in so many of us - I got a little carried away.  Graphic 45's new Voyage Beneath the Sea paper line opens up a world filled with 20000 leagues of Steampunk happiness.   Tim Holtz' dies provided the most perfect setting for this tiny crafty adventure.   Clipping pieces off some old stashed florals, adding a few handmade resin pieces and that gorgeous red haired mermaid from G45 -- it turned out striking.


I created a small box out of carstock reinforced with medium weight chipboard to fit behind the tag die cut.  A piece of acetate covers the hole to create a "window" view.  The shiny blue "coral" inside the shadowbox are punches from Tim's new Branch punch.

Most resin pieces were from Martha Stewart and Mod Podge silicone molds.  The diving helmet was from a mold that I had made from a pendant. Real seashells were found on the beach during a past vacation to the Outer Banks of North Carolina, and the real watch parts are from RedRooster UK.   
Metal Film (the shiny blue and green on the cardboard) is Minc Reactive Foil.  Fibers and laces are from a local craft shop & art boutique here in Blackfoot, Idaho, the Stinkin' Cute Scrapook Shop & Boutique.  After making the first one, I decided to make more for a swap I had joined over at Mini Album Scraps.
Backs of shadowbox tags have a pocket for a personal note or gift card, sides are decorated with Inka rubs and raised glued "webs".